Bob said, “When we arrived on the call, the furnace would not fire and the owner had reset the red reset button several times. We decided to give the furnace a complete tune-up before we tried to start it because we found evidence of previous adjustments, such as different size oil nozzles. It was a big unknown until we got the system to a baseline condition.”
Tim said, “Right, we put in the correct nozzle using the unit nameplate information and then made sure that the oil nozzle pressure was correct for the furnace. Then we did a complete tune-up on the furnace. What I asked you to do is explain the tune-up step by step to me again. We did this procedure in school, but I need a review.”
Bob then stated, “The first thing that we did was give the complete system a visual check by:
1. Inspecting the tank for being level and that the fittings and piping were not kinked.
2. Then we used a paste applied to the oil measuring stick to make sure there was oil in the tank and no water in the bottom of the oil. The paste would change color in the water.
3. We then checked the flue and barometric damper for proper working characteristics.
4. We inspected the inside of the combustion chamber for excess oil, which we found and removed with a rag.
5. We made sure that the air registers were all open.
6. We cleaned the air filter and then we started the tune-up on the burner.”
Tim said, “It seemed that we did a lot before we actually started on trying to fire the burner.”
Bob said, “Yes, we did. The whole system must work together. I don’t think that it makes for a good service call to just go in and make a quick repair and leave. Then you are often called back to fix something that you should have spotted the first time. The oil burner is the residential heating system that really benefits from a performance tune-up, because there are so many variables.”
Tim said, “I agree, it is not good to get a call back.”
Bob continued, “We then got serious about the burner tune-up:
1. We got the full kit of tools and instruments together (Figures 1 and 2).
2. We changed the nozzle and oil filter, using the nozzle that the manufacturer recommended.
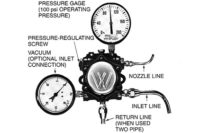
3. We used a set of gauges to verify that the pressure to the nozzle was 100 psig, which is typical. Someone had used various different nozzles, and when this is done, the pressure is often changed. The gauges proved that we had the correct pressure delivered to the nozzle.
4. With the furnace started, we first verified the draft over the fire and set it to 0.02 in. water column.
5. Then we verified the draft to be 0.04 where the flue leaves the furnace, described as the breach.
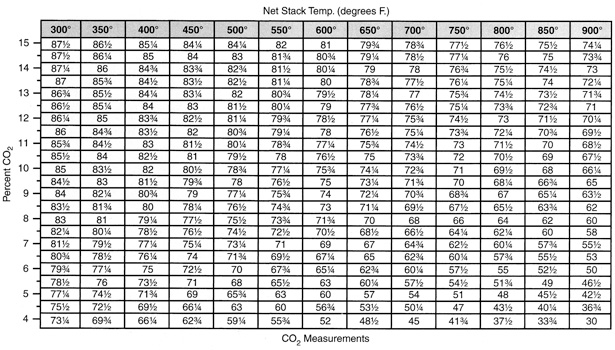
6. Then we let the furnace warm until the thermometer stopped rising, at 500°F which meant that the net temperature was 450° (500° reading – 50° room temperature = 450° net).
7. Then we ran a smoke test and found the smoke level to be No. 2, a little smoky.
8. We then gave the furnace a little primary air at the air shutter.
9. We then ran another smoke test and found the smoke level to be No. 0 and declared the furnace vent system to be in order.
10. Then we ran a flue gas analysis test and found the CO2 level to be 8.5 percent.
11. We checked the combustion efficiency chart and found the furnace to be operating at 76.5 percent efficiency (Figure 3).”
Tim said, “That is a long procedure, but the furnace should be good for another year. Then I suppose it will need to be done again?”
Bob said, “It will still run, but it is very questionable whether it will maintain the good efficiency that we achieved. These burners are not like gas burners that have permanent adjustments that do not get out of calibration.”
Then Bob added, “I am glad to see that you took extra time to have this review. Our education never stops. What we do after work has a great deal of bearing on our future. During the work day, you only learn what all of the others learn. What you learn after work carries you further than a typical technician. You will progress much faster with more knowledge.”
Publication date: 12/17/2012


