
A well brazed joint begins with a proper fit between components, .001 inch to .003 inch of clearance.
1. GOOD FIT AND PROPER CLEARANCE
The best clearance between the two metal parts being brazed is a close one - usually .001 inch to .003 inch, and generally not more than .005 inch. If the clearance is smaller than .001 inch, there may be no room for the molten filler metal to flow through the joint. And if the clearance is wider than .005 inch or .006 inch, capillary action is less effective and the filler metal may fail to fill the joint completely.In the fabrication of HVAC equipment, achieving the proper clearance for brazed joints is seldom a problem. The design of the joint is predetermined - it’s almost always a “cup” design, in which one tube is inserted into the expanded end of another tube. As long as you start with tubing that’s round and manufactured to the correct dimensions, you can anticipate no clearance problems.
However, you do have to give some care to the preparation of the tubes for brazing. For example, if you’re brazing a tube to a fitting, you’ll generally start by cutting the tube to the length you want. Make sure it’s cut square, by using a sawing vise or tube cutter, and remove the burrs. Slide the tube end into the fitting and check that it has the proper close fit - an easy slip fit.
The majority of brazed joints in HVAC units are copper-to-copper joints. That means you don’t have to worry about the “coefficients of expansion” of the base metals, as the two copper parts will expand at the same rate. However, if you’re brazing joints of dissimilar metals (copper to steel) you have to take into consideration the different expansion rates. You know that non-ferrous metals (copper, brass) expand more during heating than ferrous ones (steel, stainless steel). So, be sure to adjust the initial joint clearance accordingly. Where heating will reduce the clearance, for example brazing a copper tube to a steel header, start with a relatively loose fit (approximately .010 inch). Where heating will increase the clearance, start with a close or even force fit.
2. CLEANING THE METALS
Capillary action, the basis of all brazing, can’t work properly on dirty surfaces. If the surfaces of the metals are contaminated (with oils, dirt, etc.) the brazing filler metals will not adhere to them and the joint will fail.In fabricating HVAC units, you’re generally working with factory new tubing and parts. But if for any reason those parts have become dirty or greasy, you will have to clean them to ensure a leak tight joint. Oil and grease can be removed with a solvent, then oxides can be removed by an abrasive like an emery cloth. Once the parts are clean, it’s recommended to braze as soon as possible so the parts won’t have time to become re-contaminated.

3. FLUXING THE PARTS
Flux is a chemical compound, usually made in the form of a liquid or paste, which is applied to the joint surface prior to brazing. Its purpose is to protect the joint surface from the oxides that form during heating. Flux melts and becomes active during brazing, absorbing oxides and assisting in the flow of the brazing alloy. Although fluxing is generally an important part of the brazing process, it plays only a minor role in brazing HVAC components because most of these joints are copper-to-copper. When brazing copper-to-copper you can eliminate the flux by using a phosphorus bearing filler metal (such as Sil-Fos® or Fos Flo®) because the phosphorus acts as a fluxing agent.However, when brazing copper to steel (in compressor or valve assemblies) you can’t use phosphorus bearing filler metals as they form brittle phosphides and the joint could fail. Instead use a phosphorus-free filler metal (such as the Braze™ family of alloys), but then you will have to use a flux. When brazing brass, you could use a phosphorus bearing alloy, but you will have to apply flux here as well.
Flux can be applied on the parts being brazed with a brush, or it can be incorporated directly into the filler material in the form of flux-cored or flux-coated wire or rod. However the flux is applied, it is important that it does not get inside the parts where it could contaminate the system.
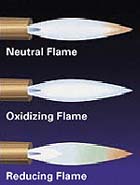
A reducing flame is recommended when brazing.
4. ASSEMBLE FOR BRAZING
Before the parts can be heated and brazed, they have to be aligned and then supported. This is typically not an issue when brazing HVAC components since virtually all the joints are tubular, slip-fit assemblies. By their nature, they are self-aligning and self-supporting during the brazing process.When assembling, make sure there is full insertion of one tube into the other before brazing. The distance of insertion should be equal to the inside diameter of the inner tube section.
Bring both pieces being brazed up to temperature evenly and quickly.
5. BRAZING THE ASSEMBLY
The actual brazing operation is a two-part process: first, heating the base metals, and second, applying the filler metal to the joint.Regardless of the heating equipment being used, be sure to heat both base metals broadly and evenly, so the filler metal will wet equally well on both metal surfaces and completely fill the joint. Because of the wide variety of joints and joint locations, the gas-air torch is frequently used as the heat source. A soft flame provides the best type of heat.

Once the assembly has reached brazing temperature, the filler metal is applied.
Start heating the tube about an inch away from the end of the fitting, then shift the heat to the fitting. Sweep the heat steadily back and forth from tube to fitting, with most of the heat being applied to the heavier (and slower to heat) fitting.
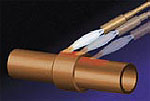
A well brazed joint - Proper alloy flow reaches inside the joint.
At this point, pull the flame back a little and apply the filler metal firmly against the tube at the junction of the tube and fitting. If you are using a phosphorus-bearing alloy, lay the rod on and wipe it around the joint, as these alloys tend to flow sluggishly. If the joint has been properly heated, the filler metal will melt, penetrate, and completely fill the joint.

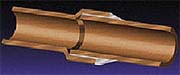
Improper alloy flow does not penetrate into the joint and produces a weak bond.
6. CLEANING THE BRAZED JOINT
Generally speaking, brazed joints in HVAC units require no post braze cleaning operations. However, in the minority of cases where flux has been used, it may be necessary to remove the flux residues after the joint has set. A hot water wash, assisted by brushing or swabbing, usually does the job. If necessary, you can remove more stubborn residues with a wire brush.
SOME THINGS TO CONSIDER
When you’re heating an assembly for brazing, you want to heat the joint area as rapidly and as uniformly as possible. So in those instances where you’re joining metals of unequal mass and thickness, you’ll have to apply some extra heat to the heavier section which heats more slowly. And where you’re joining dissimilar metals with differing heat conductivity (copper to steel), you’ll have to apply proportionally more heat to the copper, since copper is a better conductor and carries heat away more rapidly to the colder sections. In no case, of course, should the metals be heated to the point where they begin to melt.THREE COMMON JOINTS
The brazing techniques described will vary somewhat depending upon the kind of joint you’re making. The three common tube-to-fitting joints used in HVAC components are the vertical down, the vertical up, and the horizontal joint. The following procedures are recommended for each of these joints:Vertical down joints:Bring the entire joint area up to temperature quickly and uniformly, heating the tube first, then the fitting. When the joint area has reached brazing temperature, apply a little extra heat to the fitting, since this is the direction in which you want the filler metal to flow.
Vertical up joints:Start by heating the tube. When it has reached a temperature of about 800°F (425°C), transfer the heat to the fitting. Then sweep back and forth from fitting to tube, all around the joint area. Be careful not to overheat the tube below the fitting, as this would encourage the filler metal to run down the tube and out of the joint. When brazing temperature is reached, touch the filler metal to the joint with the flame on the wall of the fitting. This heating pattern will draw the filler metal up and completely through the joint area.
Horizontal joints:Preheat the tubing and fitting quickly and evenly. When brazing temperature is reached, apply the filler metal to the top of the joint. The combination of gravity and capillary action will draw the filler metal completely around the tube to its bottom. You can apply a slight excess heat to the bottom of the fitting to ensure that the filler metal totally penetrates the joint. Check the joint face to be sure filler metal is visible all around it. In particular, make sure that filler metal shows at the top of the joint. If it does not, apply some additional filler metal until it is visible all around the joint.
Reprinted with permission from the Sil-Fos Website. Sil-Fos brazing products are supplied by Lucas-Milhaupt Inc., a Handy & Harman Company, one of the world’s leading suppliers of brazing and soldering materials. For more information, visit www.silfos.com.
Publication date:04/07/2008


