The analog manometer, commonly referred to as a Magnehelic®, is a test instrument that has been around the HVAC industry for decades. Among many technicians in the field, it is still the test instrument of choice for measuring the static pressure of an HVAC system. This instrument can handle daily field use by a technician and is cost-effective. These qualities make it an attractive option to many who might be considering its digital counterpart. I’ll be looking at some of the basics of this test instrument and some unique benefits it offers in this article.
How it Works

|
| A manometer can be used to emphasize high static pressure based on the position of the needle as testing is performed. This allows a technician to keep things simple when discussing restrictive duct systems and components. |
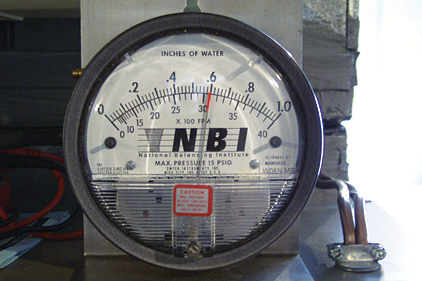
Analog manometers are available in a variety of scales for use in the HVAC industry. These instruments are also available in various pressure units varying from pascals and inches of water column (wc) to pounds per square inch. This is also one of the drawbacks of the analog manometer. Many technicians work over a wide variety of pressure ranges with the various types of systems they encounter. This will require a technician to purchase multiple manometers to cover the range of pressures they work in. Don’t purchase the largest scale manometer you may need and think it will be accurate enough for low-pressure measurements. It won’t. For measuring static pressure, the scale on an analog manometer needs to measure 0-1.0 inches of wc for best accuracy.
The analog manometer has a very sensitive diaphragm that responds to changes in pressure. When pressure is exerted on the diaphragm, the dial of the manometer responds accordingly and moves to the appropriate pressure. For this diaphragm to function correctly, positioning of the instrument is important. An analog manometer must be level and in the vertical position when measuring pressure. If the manometer is in any position other than level and vertical, the diaphragm can sag and cause a shift that leads to inaccurate readings.
Due to the shape of the lens of an analog manometer, you must determine your pressure readings while looking straight at the dial on the gauge. If you look from any other angle, you will obtain inaccurate readings due to distortion from the lens. This is often referred to as parallax error.
On the face of some manometers, you may notice one or two scales. If there are two scales, the upper scale usually displays inches of wc, while the lower scale is in feet per minute (fpm). You will want to ignore the fpm scale, as this will only apply when used in conjunction with a Pitot tube to perform a duct traverse. The wc scale is the one you will use for measuring static pressure.
Pressure Increments
On a 0-1.0 inch wc scale, there are increments of pressure on the dial of the gauge. The primary increments of pressure are based on tenths of an inch of wc. These increments will range from 0.10 to 1.0, with these numbers being listed above the indicator on the dial. Some manometers list all of these increments on the top of the scale, while others list only even numbers on the scale. When this occurs, the odd numbers are left out and will have to be determined by you. The numbers shown would range similar to this, in inches (0, 0.2, 0.4, 0.6, 0.8, and 1.0).
The secondary increments of pressure are based off hundredths of an inch of wc. These increments will be located in between the tenths values on the manometer. The values for these increments will be based off even numbers in the hundredths place. So the scale between 0.2 and 0.3 would appear as follows: (0.2, 0.22, 0.24, 0.26, 0.28, and 0.3). This gives you an idea why you need to look at the gauge from the front. It is easy to misalign the values from any other angle of view.
The Ports
The ports of an analog manometer often create some confusion as they are listed as high and low on the manometer instead of positive (+) and negative (-). The easiest way to keep these ports straight is to compare the high and low values with the reference pressure they will be measured to. The reference pressure is almost always going to be the space the other port is open to. Typically this will be the room you are testing in.
Positive pressure in a supply duct would be taken on the high port of the manometer, as this pressure is higher than the room reference pressure. Negative pressure in a return duct would be taken on the low port of the manometer, as this pressure is lower than the room reference pressure.
It’s easy to forget to switch the hose as you move from positive pressure to negative pressure. One indicator this may have occurred is if the needle on the gauge buries itself to the left side of the scale. When this happens, ensure you have the hose on the proper port. If the hose is on the proper port, this could be a sign that you are measuring in an area of turbulence inside the duct. You won’t see this with a digital manometer.
A variety of static pressure tests can be performed with an analog manometer as well. Pressure drop across a filter or coil can be determined or read directly. Total external static pressure can also be calculated or read directly on the manometer, too. We’ll look at how to do many of these tests in future articles.
Customer Visualization
One of the benefits of using an analog manometer in front of your customers is the visual impact it can have with static pressure testing. Many homeowners tend to blank out if you run a bunch of technical numbers past them. The impact you are looking for is now lost due to information overload. A manometer can be used to emphasize high static pressure based on where the position of the needle should be as testing is performed. This allows a technician to keep things simple when discussing restrictive duct systems and components.
Successful contractors have learned to teach their technicians about watching the needle and looking for a predetermined static pressure range. This range is typically based off a static pressure budget determined by the capacity of the fan in the HVAC equipment. Once a technician understands how to use static pressure budgets, they are able to help the customer become a detective on his or her own system. This allows the customer to be engaged in helping to solve his or her own HVAC system pressure and airflow issues.
The real benefit of this simple comparison test is that your customer now knows more about static pressure and airflow than 90 percent of your competition. This one simple step may be all that is needed to differentiate you from your competitor, who is strictly selling boxes with a name brand on them.
Publication date: 3/10/2014
Want more HVAC industry news and information? Join The NEWS on Facebook, Twitter, and LinkedIn today!


