
Why clean coils?
There are two types of coils in an AC/refrigeration system–the evaporator and the condenser. They consist of copper or aluminum tubes with aluminum fins or microchannel tubes with fin strips. If these coils are “airside,” meaning air is the heat sink or source, then air is being pulled or pushed across these coils such as in a way to induce heat transfer. There are two main reasons these coils need to be cleaned: the fins need to have a clean surface for heat transfer, and most importantly, the system relies heavily on the fan’s abilities to draw airflow across those coils.
Terrible Outcomes of Dirty Coils
Dust, cottonwood seeds, mulch, and leaves — just to name a few — can all cause air restrictions across the coils leading to terrible outcomes for the system.
Low airflow across the evaporator causes the refrigerant to not evaporate all the way. When the refrigerant does not evaporate all the way, the low-side pressure is reduced, a condition known as “low suction (pressure).” This, in turn, causes ice to form on the evaporator because the refrigerant is not “boiling.” Instead, it sits inside the coil in liquid form. As refrigerant continues to move through the system by the compressor, a formidable event can happen which is liquid refrigerant making its way into the suction side of the compressor, a death sentence for the compressor, known as a low-superheat situation, or in tech jargon, “slugging” or “flooding.”
Low airflow across the condenser creates an opposite but equally terrible effect as low airflow across its sister coil.
Low airflow across the condenser causes the refrigerant to not condense all the way. When the refrigerant does not condense all the way, the high-side pressure is increased, a condition known as “high head (pressure).” This, in turn, causes gas refrigerant to be sent to the metering device. Though a problem in and of itself, a gaseous flow of refrigerant into the metering device, can lead to sending hotter-than-normal gas back to the suction side of the compressor, causing the compressor to overheat.
All young service technicians are taught this mantra: “Compressors don’t die — they are killed.”
Some Recommended Materials for Coil Cleaning
Besides the basic hand tools, maintenance technicians should arm themselves with a variety of flexible and heavy-duty hoses, a couple sizes of nozzles, fin combs and brushes, a pump sprayer, and chemicals of their choosing. As a precautionary measure, technicians should also carry spare hose gaskets, a magnetic tray to collect all the screws, rags, and a pressure washer for locations where the water pressure is low.
Basic Steps for Cleaning the Evaporator
The evaporator coil and drain pan, in rooftop units, can be accessed by removing the filters. If there is a significant amount of dust, beyond what a brush can take care of, the maintenance technician can use a product called “No-rinse” evaporator coil cleaner. It is usually scented so the indoor occupants are not bothered by a chemical smell. The product relies on the condensation to rinse the residue. If the coil is located in a restaurant where there is a significant amount of grease to remove, use coil cleaners designed for degreasing.
Another important step with evaporator coil cleaning is to not ignore the drain pan. It needs to be inspected for cracks or large chunks of debris that could clog the drain hole. It is recommended to push water through the pan to verify the trap is not clogged. If the maintenance technician finds themselves removing the trap to clean it, it is important to push water through to refill the trap. Dry traps can cause the system to pull air in, preventing the condensate from properly draining, which can lead to the drain pan overflowing.
Basic Steps for Cleaning the Condenser
While the evaporator does not always need attention, the condenser is a component in desperate need of a wet cleaning at least once a year, in both residential split and commercial rooftop unit settings, as it is subject to outdoor conditions.
When it comes to choosing the chemical for the condenser cleaning, there are several options. Some technicians prefer using only water and chemicals as needed, while others prefer a Dawn dish soap and water mixture. Some important things to consider when choosing a chemical cleaner are whether it’s safe to use on aluminum fins, and where applicable, if it’s safe to use on microchannel. When following directions, it is important to follow recommended dwell times and give the unit a thorough rinsing before and after applying chemicals.
In commercial settings, before turning the unit off, it is important to be familiar with the site. The maintenance technician should consider the following scenarios:
- Is the unit tied in with the building’s fire alarm system? If so, the alarms must be disabled or put into test mode before turning the unit off.
- Does the unit need to be pumped down before shutting off the compressors?
- Does the unit have speed drives that could be damaged if power is shut off at the disconnect?
- Some places might prefer the indoor blower motor to stay running so the ductwork does not make banging noises.
On cleaning the condenser, the most important step is that the coil is cleaned thoroughly on both sides with very little debris or residue left behind. To ensure this, a thorough maintenance technician will take apart the system in a way that allows access to a majority of the coil, on both sides, without necessarily wasting too much time. This might involve detaching panels, “splitting” coils that are separable, and removing the condenser fans.
Click photos to enlarge

FIGURE 1: A residential split condenser taken apart with coil cleaner applied. (Courtesy of Lianna Schwalenberg)
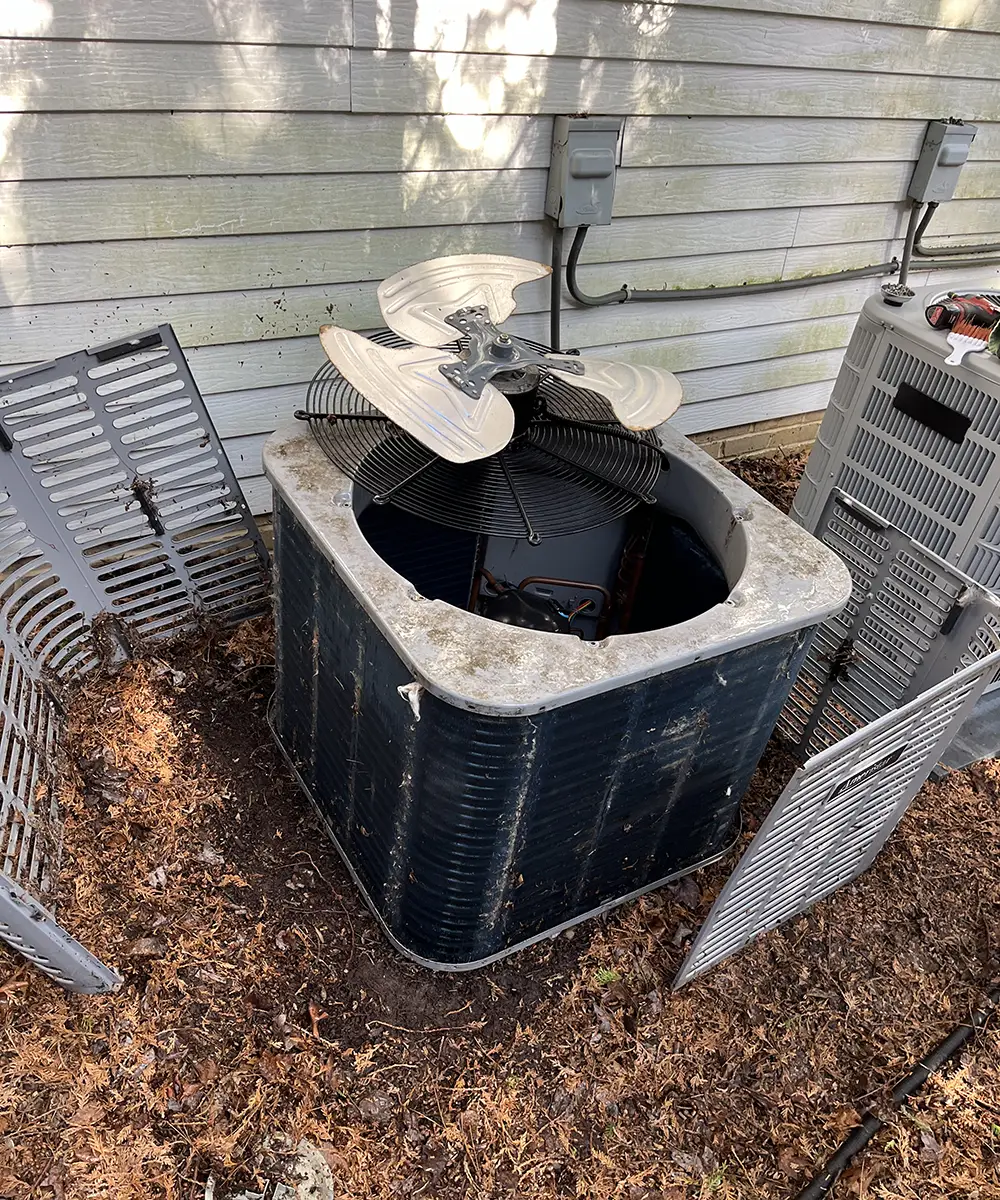
FIGURE 2: A residential split condenser taken apart. (Courtesy of Lianna Schwalenberg)
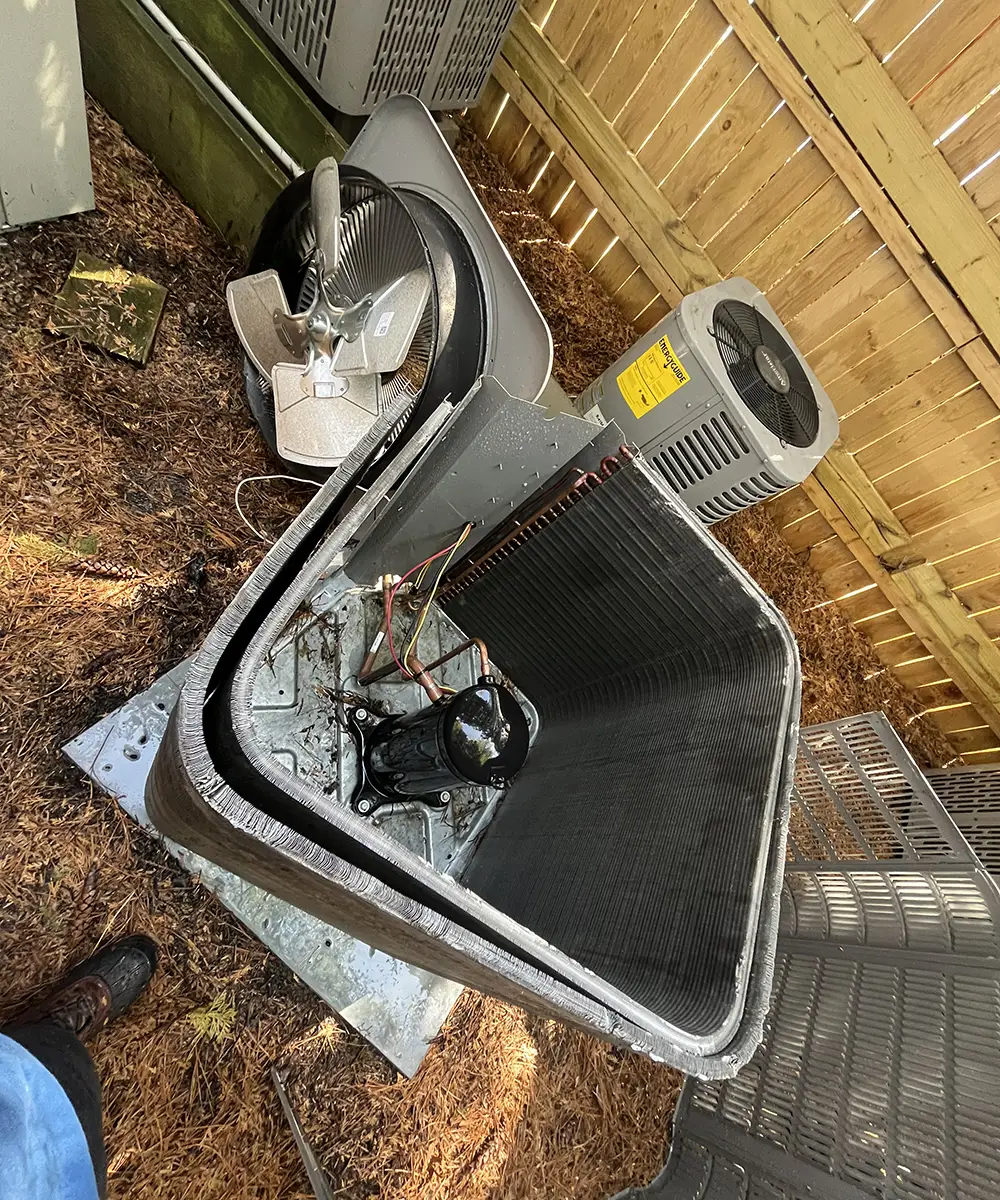
FIGURE 3: A residential split condenser with a splittable coil. (Courtesy of Lianna Schwalenberg)

FIGURE 4: Before and after using fin combs. (Courtesy of Lianna Schwalenberg)
A final note on the condenser cleaning process–while making everything look good is not necessary for the unit to operate properly, it adds that element of professionalism and good customer service. The condenser is already an eye sore, so sometimes even the smallest touch-ups can make a huge difference in appearance. If the coils are not extremely flattened, fin combs can be used to make the coil not look so beat up.
Some Avoidable Mistakes
This section is a personal message from the author as words of advice from an experienced, but imperfect maintenance technician. These are very common mistakes that can happen during the spring preventative maintenance but are easily avoidable when one is not in a rush.
- Forgetting to turn the unit back on
- Turning the unit on with the capacitor unplugged, causing a short and tripping the breaker
- Attempting to troubleshoot a high-pressure trip with the panels off
- Flooding a customer’s basement, not paying attention to the leaking hose bib
- Getting the flame sensor wet on rooftop units, causing the ignition sequence to lock out until the flame sensor is dry
- Waiting too long to rinse the condenser or not rinsing enough, causing severe white residue or black coating to strip off
- Not paying attention to the pre-shutdown list aforementioned


