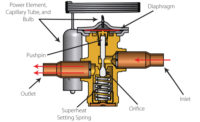
Selecting a replacement valve that matches the original capacity, body type, type of equalization, and operating characteristics is important to ensure a proper operating system.
To choose a replacement TEV with the same capacity, a technician must refer to the selection tables of the replacement valve manufacturer. To determine the correct capacity for a replacement TEV, the technician must know the BTU capacity of the system, the type of refrigerant used in the system, the pressure drop across the valve, the liquid refrigerant temperature entering the valve, and the evaporator temperature.
Most selection tables list the capacity of their valves in tons of refrigeration under various system conditions as listed above. When determining the pressure drop and liquid entering temperature, a technician should use worst-case values.
The technician then needs to match the body type of the new valve to the original valve. Make sure that the inlet and outlet connection sizes and style match the original and are located in a position that will not make its installation too difficult.
The type of equalization also needs to be matched. If an internally equalized valve is used, the replacement valve also must be internally equalized. Likewise, if an external equalizer valve was used, an external equalizer valve must replace it.
Lastly, the technician needs to make sure the replacement’s power element matches the operating characteristics of the original valve.
Once the correct TEV has been chosen, the technician needs to install it into the system. If the valve is to be brazed into the system, it is a good practice to wrap the valve body in a wet rag and not direct any heat toward it.
When securing the sensing bulb to the suction line, always follow the manufacturer’s recommendation for proper location. As a general rule, however, the sensing bulb should be secured to a horizontal section of pipe at the outlet of the evaporator.
On pipe sizes 7/8 of an inch and larger, it is recommended that the bulb be located at the 4 o’clock or 8 o’clock position. On smaller sized pipe, any area of the pipe except the bottom portion is acceptable. When securing the bulb to the pipe, make sure it has good thermal contact, using two straps to fasten the bulb to the pipe.
Always check the superheat setting of the valve once it is installed. Do not rely on the manufacturer’s setting for the system you are working on. Always check and make the necessary adjustments.
Let the system run 15 minutes so that the valve can stabilize before taking any readings or making any adjustments.
Replacing a TEV is generally a simple task. However, it is a time-consuming repair that shouldn’t be rushed.
Marchese is owner of Coldtronics of Pittsburgh, PA. He can be reached at 412-734-4433; www.coldtronics.com (website); or joe@coldtronics.com (e-mail).
Publication date: 09/02/2002


