Plan Ahead
You can plan for maintenance even before a building is constructed by following these pre-installation steps:Easy access to inner parts reduces both the difficulty and the amount of time required for preventive and predictive maintenance procedures. While all manufacturers design their units to be accessible, some offer hinged access doors on one or both sides of the unit as standard equipment, versus removable panels secured with screws. Panels and screws on larger rooftop equipment can be difficult to remove and re-secure, especially in windy conditions or when the units are installed high above the roof deck.
Install units according to the manufacturer’s installation documentation to maintain required clearances for maintenance, service, and proper unit operation. Follow these general guidelines:
1. Units mounted too close to the edge of the roof will restrict service access to one side of the unit.
2. Units installed too close to architectural fences may obstruct access and fresh air intakes.
3. Exhaust hoods installed too close to the fresh air inlets could allow exhaust air to enter the fresh air intake.
4. Design ductwork and piping for unrestricted access to normal maintenance areas.
5. Install catwalks level with the bottom of the unit to allow access to the unit interior from a flat surface. A roof curb or post and beam support can add two to five feet (or more) to the height of a unit above the roof, making it difficult or impossible to reach most of the unit interior. Using a ladder for access to this type of installation can be hazardous and discourage proper maintenance.
Most rooftop equipment can be connected digitally to modern building automation systems (BAS) that provide data to help diagnose operational deficiencies. However, HVAC connections to BAS are not standard. The desired data points that are made available to the BAS should be specified prior to installation to optimize their usefulness in maintaining the equipment. In addition, specifying an open, standard communication protocol, such as BACnet® or LonTalk® can help ensure the sustainability of communications as the BAS system evolves over the life of the equipment.

Maintenance Requirements
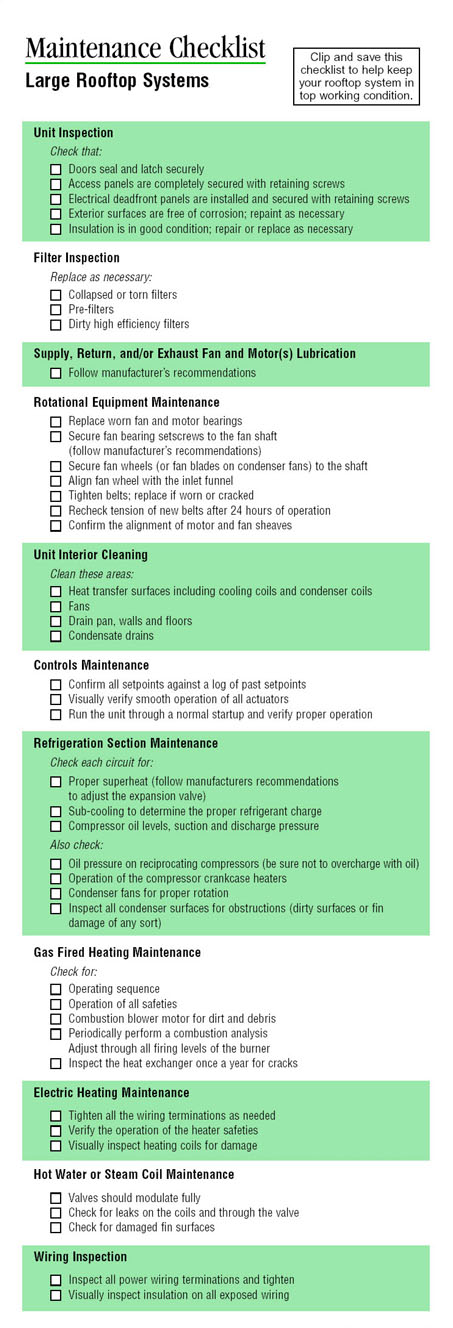
While individual unit requirements vary from manufacturer to manufacturer, these standard maintenance procedures will help keep all rooftop units running at their design efficiency:Regularly inspect the unit for wear and tear.
1. Inspect doors for proper seal and latch operation.
2. Verify that all access panels are completely secured with retaining screws.
3. Check that electrical deadfront panels are installed and secured with retaining screws.
4. Inspect exterior surfaces for corrosion and repaint any surfaces that have corrosion present.
Most units are equipped with filters or filtration systems, including pre-filters, high-efficiency cartridge or bag filters, or final filtration in the form of HEPA filters. Inspect these filters regularly to help maintain the integrity of the filtration systems. Collapsed or torn filter sections will allow unfiltered air into the airstream, which will affect indoor air quality. Dirty filters will increase fan brake horsepower requirements. Replace less expensive pre-filters regularly to extend the life of the more expensive high-efficiency filters downstream.
Filter indicators (switches or differential pressure transducers) in variable air volume (VAV) units can be misleading because the fan is operating at less than 100 percent capacity most of the time. Therefore, a dirty filter will present a smaller differential and appear to be clean. A more accurate indicator is to log fan operating hours and correlate that to visual inspection of the filters.
All rooftop systems contain at least one supply fan and motor, and often a return or exhaust fan(s). These fans and accompanying motors will be equipped with bearings that will require lubrication. Follow the manufacturer’s recommendations.
Regularly inspect rotational equipment as follows:
1. Check fan and motor bearings for signs of wear and over-lubrication.
2. Check that the fan bearing setscrews are tight to the fan shaft (follow manufacturer’s recommendations).
3. Verify that fan wheels (or fan blades on condenser fans) are properly secured to the shaft.
4. Check that the fan wheel is in proper alignment with the inlet funnel. Excessive clearance will cause loss of fan efficiency.
5. Check belts for excessive wear. Replace if worn or cracked.
6. Check for proper belt tension. Make sure that the motor mount is fully secured. If belts have just been replaced, recheck belt tension after 24 hours of operation.
7. Confirm the alignment of motor and fan sheaves.
The importance of cleaning cannot be stressed enough for proper unit operation and good indoor air quality (IAQ). Clean units also simplify diagnostics because problem areas such as leaks (refrigerant, water, etc.) or bearing seal failures are more noticeable. Frequent cleaning can help you detect small problems before they become big problems.
1. Dirty heat transfer surfaces will limit the operation of the unit.
2. Dirty condenser coils will eventually result in high pressure faults and higher electrical consumption.
3. Dirty cooling coils could result in low pressure faults, reduced unit capacity, or premature compressor failure.
4. Dirty fans can cause wheel imbalance leading to vibration and eventual failure.
The cleaning process can damage coils, so carefully brush dry coils to prevent fin damage, and remove debris gently with compressed air. Use a detergent with a pH neutral solution and thoroughly rinse after cleaning.
Inspect inner surfaces of the unit regularly to detect and remove any microbial growth. Pay close attention to the drain pan under the cooling coil and check for any standing water. This process is greatly simplified with metal lined units and sloped drain pans. Condensate drains must be properly trapped and clean. Condensate should be piped away from the unit according to local codes.
Controls on larger rooftop units can be very sophisticated. Digital controls maintain proper cooling or heating capacity, introduce the proper amount of outdoor air and, in the case of a VAV unit, vary the capacities of the supply and return or exhaust fans. The control system also detects and reacts to problem conditions (safeties) to help protect various components of the unit. A keypad display on the unit that displays messages in English (versus code) can be very helpful in quickly determining unit performance. Check these control parameters regularly:
1. Confirm all setpoints against a log of past setpoints.
2. Visually verify the smooth operation of all actuators on the unit.
3. Pay particular attention to the operation of the economizer dampers. Observe that the actuator functions properly and the outdoor air damper seals completely during unit shutdown.
4. Run the unit through a normal startup and verify proper operation.
The refrigeration section of the rooftop unit represents a major portion of the unit investment and the energy used by the unit. Careful maintenance procedures such as those outlined below will help to protect this investment:
1. Check for proper superheat on each circuit. Adjust the expansion valve under conditions defined by the manufacturer.
2. Check the subcooling on each circuit. This can be very useful in determining the proper refrigerant charge.
3. Check compressor oil levels, and suction and discharge pressures on all circuits.
4. Check the oil pressure on reciprocating compressors (be sure not to overcharge with oil).
5. Check the operation of the compressor crankcase heaters.
6. Verify that condenser fans are all operable and rotating in the proper direction.
7. Measure and record the amperage of compressors running at full load.
8. Inspect all condenser surfaces for obstructions (dirty surfaces or fin damage of any sort).
Problems in the heating section can quickly develop into fire and safety hazards. Maintenance here is essential.
On units with gas-fired heating:
1. Periodically check the operating sequence.
2. Check the operation of all safeties.
3. Periodically perform a combustion analysis. Adjust through all firing levels of the burner.
4. Inspect the heat exchanger once a year for cracks.
5. Check combustion blower motor for dirt and debris.
On units with electric heating:
1. Check all the wiring terminations and tighten as needed.
2. Verify the operation of the heater safeties.
3. Visually inspect heating coils for damage.
On units with hot-water or steam coils:
1. Make sure valves modulate fully.
2. Check for leaks on the coils and through the valve.
3. Check for damaged fin surfaces.
Problems with power wiring can cause damage to electrical components such as motors, compressors, contactors, and variable speed drives. Time spent here will pay off in extended equipment life.
1. Inspect all power wiring terminations and tighten.
2. Visually inspect insulation on all exposed wiring.
Regular Maintenance Saves Time, Keeps Customers Satisfied
A regular maintenance schedule that incorporates the manufacturer’s printed maintenance instructions as well as the standard procedures listed above will help keep rooftop equipment operating reliably and efficiently throughout its useful life. Regular maintenance not only reduces the time you spend maintaining equipment, it assures your customers that their equipment is being well cared for — and that leads to repeat business.Paul Hollingsworth is service and maintenance training manager for McQuay International, Minneapolis. For more information, call 800-432-1342 or visit www.mcquay.com.
Publication date: 06/30/2003


