Bob and Tim have just repaired a leak on a 10-ton commercial air conditioning system and are ready to charge the unit. The system has a thermostatic expansion valve (TXV) for the evaporator.
“What is the charging procedure for a system like this, we mostly work on residential,” Tim asked.
“This is a thermostatic expansion valve system, and it is to be charged like all thermostatic expansion valve systems that use regular refrigerants. This system uses R-22, and we will charge it using the subcooling method. When we get the correct charge in the system, we will then double check the superheat at the evaporator to make sure the system is functioning correctly,” Bob replied.
“Would you please describe the procedure to me as we go through it and tell me why we are doing each step?” Tim requested.
Bob told him to get the temperature tester, and fasten the remote temperature lead to the liquid line where it leaves the condenser. He cautioned Tim to insulate the lead from the ambient temperature, explaining, “We want to take the temperature of the line and be sure that we are getting only the temperature of the line and not the air temperature. All thermometers read out the temperature of the bulb or sensor of the thermometer. We have to be sure that the bulb or sensor of the thermometer is attached to whatever medium we are trying to check to get the bulb as close to the temperature of the refrigerant inside the line as we possibly can.
“We should always think about what the job of the condenser is when we are charging a system by subcooling. The condenser has three functions in the system:
1. It must de-superheat the refrigerant leaving the compressor and entering the condenser;
2. It must then condense the hot gas from the compressor into the liquid state; and
3. Once the refrigerant is in the liquid state, it must then be cooled 10°-15°F below the condensing temperature. That is called subcooling.
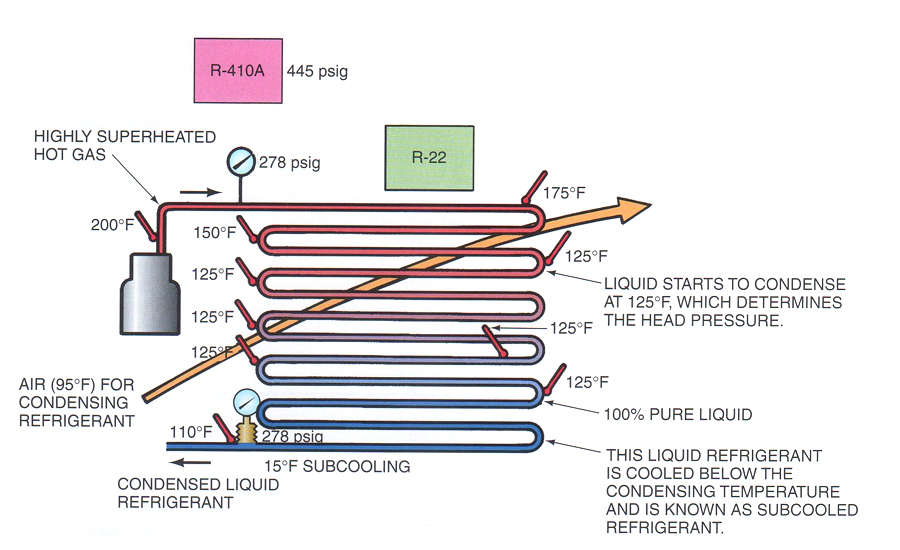
Think of it like this, the hot gas leaving the compressor is probably about 200° at the discharge area leaving the cylinder in the compressor. Then, the gas moves to the discharge line and starts cooling down before it ever gets to the condenser. When the hot gas molecules enter the condenser line, they are highly superheated above the potential condensing temperature. With standard efficiency equipment, we should be able to use 95° air with an air cooled condenser to condense the refrigerant at about 125°. The air is able to condense the refrigerant at about 30° higher than the outdoor air, (95+30=125 — see Figure 1). I have brought along an illustration of exactly how this works. Looking at the illustration, refrigerant leaves the compressor at 200° and 278 psi. The hot vapor refrigerant quickly cools using 95° air to the point that it starts to condense to a liquid at 125°. The condenser now has a partial liquid, partial vapor mixture with the 95° air passing over this mixture and continuing to condense the refrigerant. It will begin to turn into pure liquid with no more vapor. The liquid temperature will be 125°. The liquid is still well above the air temperature passing over the coil, which is 95°. This is the beginning of what is called a subcooling circuit. The 95° air will cool the remaining liquid down to about 15° below the condensing temperature. This will cool the liquid down to about 110° (125-15=110). The liquid will now enter the metering device. In this illustration, the metering device is a capillary tube, but it is still subcooled 15° below the condensing temperature and is pure liquid with no vapor bubbles.”
“Why do we need this subcooling when the system will run without it?” Tim asked
“Yes, the system will run without subcooling, but it will not be as efficient. The subcooling adds capacity to the total system, and it cost nothing but a little bit of air passing over an extended condenser surface. We don’t have to pay to compress it, we just have to take a little bit of heat out of the liquid before it gets to the liquid line, and we will gain about 1 percent efficiency for every degree Fahrenheit of subcooling we have accomplished. It reminds me of a story of a friend who was working on a commercial system one time in a building, and he got the unit all charged until he had a clear sight glass at the expansion device and declared the system operational,” Bob said. “He got a call the next the morning saying the building never get cool the afternoon before. He went back to the job and found the site glass was still clear liquid (a sure sign of a complete charge), so he thought the system was fully charged. He called the manufacturer, and the manufacture explained to him that he must charge the system to 15° of subcooling to get maximum capacity out of the system. So, he added more refrigerant until he achieved 15° of subcooling and called back late that afternoon and the system was cooling the building. The additional 15° of subcooling was what allowed the system to have its rated capacity to the maximum. SO, subcooling can be important.”
“What would happen if we just kept adding refrigerant and tried to reach 25° or 30° of subcooling? Wouldn’t we just achieve more capacity?” asked Tim.
“That’s a good question,” Bob said. “We would then have more liquid in the condenser than the condenser could manage. Liquid would start backing up in the space that would be used for condensing the vapor, and the head pressure would start rising, but the efficiency would start falling. Remember, it would take a very large oversized condenser to be able to cool the liquid refrigerant down to 95°. There are air conditioning systems that use a floating head pressure system and allow the refrigerant to be subcooled to a much lower value in low ambient conditions. This is a special application. This method is also used in the refrigeration of foods industry. A lot of energy can be saved by taking advantage of subcooling liquid refrigerant before it enters the expansion device.”
“OK, let’s tune the system up and charge it for optimum subcooling,” said Tim.
“Go ahead and place a thermometer on the suction line, and we will monitor the superheat as we go,” said Bob. “We need to always check the superheat anyway, so now is a good time. We only need two readings to prove what the subcooling level is. All we need to know for the subcooling is the head pressure and the liquid line temperature leaving the condenser. We only need two things to know what the superheat is, as well — the suction pressure converted to evaporator temperature and the temperature of the suction line at the evaporator. Since this is a package unit, we can get all of these readings right at the unit. If it were a split system, we would need to get a good suction pressure reading at the evaporator outlet and the temperature at the evaporator suction line. This could require two sets of gauges and two temperature testers. But today, we’re going to only concentrate on the subcooling portion of the system.”
It was a very hot day — 96°. The system was operating with a head pressure of 278 psig. This equates to a condensing temperature of 125° for R-22. The temperature of the suction line leaving the evaporator was 50° while the suction pressure was 69 psig. The 69 psig suction pressure equates to 40° of operator boiling temperature. The unit is operating with 10° of superheat (50-40=10).
“This was a perfect day to do this because it is so hot,” said Tim. “What would we do if we were trying to check this subcooling on a 70° day, which is 25° below the design operating temperatures for this condensing unit?”
“If it were a mild day, we would block the condenser and force the head pressure up to what it should be on a design day. We could block the condenser, get the head pressure up to 278 psig, and simulate a design day to charge for 15° of subcooling. We cannot always count on being able to charge a system on a design condition day, so we have to do a workaround by blocking the condenser,” Bob explained.
“This system is operating as good as it can operate and doing a great job. We have tuned the system up to get maximum efficiency, which would be the be most efficient power consumption the system can perform at,” Tim said.
“It is always best to leave the equipment operating at its top performance. The customer will never know the difference, but we will.” Bob said. “We have to live with ourselves you know.”
Publication date: 06/19/2017
Want more HVAC industry news and information? Join The NEWS on Facebook, Twitter, and LinkedIn today!


