
Bob and Tim are at a job where a customer has damaged a refrigerant line on a heat pump. When they arrive, the line is still blowing a slight amount of vapor from the split in the line. They install gauges and the system is at 0 psig. The refrigerant is R-22. They get the torch and braze the refrigerant leak closed. There is no need for a vacuum because the leak was repaired before any air had time to enter the system. It is 35 degrees outside, and they now must charge the unit. There is no charging chart in the unit so they are going to need to improvise.
“How are we going to get an accurate charge into the system with no chart?" asked Tim.
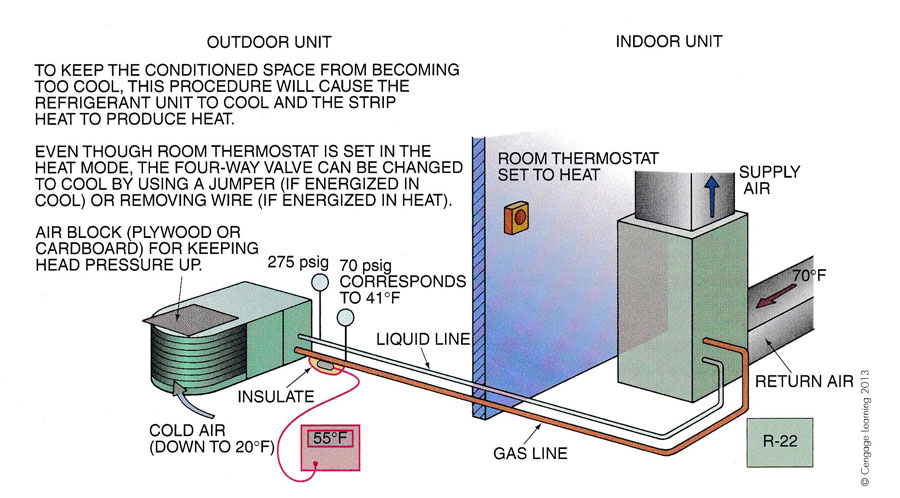
“This system has an orifice metering device," Bob explained. "In the summer time operation, we would charge this system by the superheat method while simulating a 95˚ day. If it was an 80˚ day, we would use a garbage bag or some other device to block the air leaving the condenser, and charge to about 10 degrees of superheat for a system like this with a short suction gas line. That charging method will work in the winter time also. We will need to take some extra things into consideration.
"First of all, it could get cold in the house during the procedure, so we will make sure that the auxiliary heat is operating and change the system to cooling by re-positioning the 4-way reversing valve," he continued. "This systems valve is energized in the heating cycle, so all we have to do is remove the low voltage 'orange' wire and the unit will change over and run in cooling while the thermostat is calling for heat, with the auxiliary heat operating. Secondly, we will not get an absolutely perfect charge because there will be very little latent heat load on the evaporator. It will be close enough to be efficient."
“What do we do first?" Tim asked.
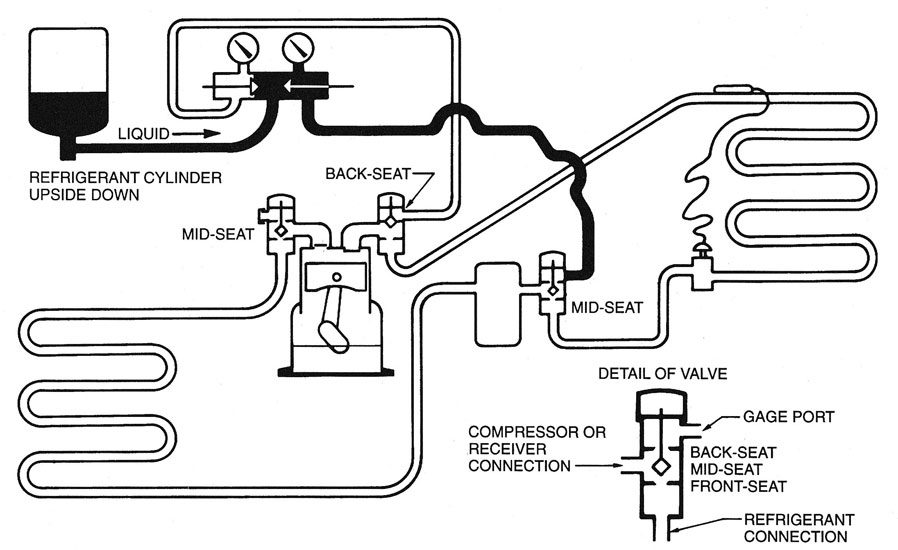
“We connect the refrigerant cylinder to the gauge lines and bleed the air out of the lines with refrigerant vapor," Bob replied. "Then turn the cylinder upside down and open the manifold valve to the system liquid line (Figure 1). Liquid will flow into the liquid line and begin to move towards the indoor coil and the outdoor coil. You can allow the liquid to flow until it stops flowing and will not flood the compressor. When the liquid stops flowing, shut the valves and set the cylinder in a bucket of water, just as it comes from the faucet. While charging liquid from the cylinder, the cylinder will loose very little pressure. When charging vapor from the cylinder, the cylinder will drop in pressure quickly. When placing the cylinder in the bucket of water it will keep the refrigerant cylinder temperature warm enough to keep the pressure up while charging vapor into the system to complete the charging procedure.”
Bob and Tim started the system after the liquid refrigerant stopped flowing. They had the condenser blocked to make the head pressure rice to a design summer day (Figure 2). The head pressure started to rise, and Tim asked, “At what point do we start watching the superheat?"
“When the head pressure is up to about 250 psig and the suction pressure is in the high 60’s, we will be getting close," Bob said. "The suction pressure is 65 psig now, add a little more vapor."
The suction pressure gradually rose to 68 psig. The head pressure was 275 psig and the suction line temperature was 55 deg. The typical head pressure for a unit like this on a cooling design temperature day would be about 275 psig. The refrigerant in the evaporator was boiling at 37˚, so the system was operating at 18 degrees of superheat. (55˚ suction line – 37˚ boiling temperature = 18˚ superheat).
“Add a little more refrigerant," Bob said.
Tim added some more vapor. The suction pressure remained at 68 psig, but the suction line temperature dropped to 50˚ and 13˚ of superheat. (50˚ – 37˚ = 13˚ superheat). He added a little more vapor, and the suction line temperature dropped to 48˚. The superheat was now 11˚. (48˚ – 37˚ = 11˚). The suction pressure is reading a little low because the house temperature is a little low. Also, there is not as much latent load on the evaporator due to low humidity.
“That is close enough," Bob said. "Remove the plastic from the coil so air can flow freely over the coil. Put the orange wire back on the terminal and the system will change back to heating."
Tim replaced the wire and the system changed back to heating. The unit made the same noise that it would make while changing out of defrost, like a toilet flushing.
They watched the gauges and the unit was operating at normal conditions.
“The system seems to be operating correctly," Bob said. "We are done here”.
“What is the bases for charging in the cooling mode?" Tim asked.
“If we tried to charge the system in the heating mode using the superheat mode of operation, the system would respond very slowly," Bob explained. "The outdoor coil is much larger than the indoor coil, and it would be operating at a much lower temperature. It also would have an orifice metering device. It is possible that it could be done, I just have never tried it. I have used this method in temperatures down to about 20˚ F with good results.”
“Experience is a good thing to have," Tim said. "I am fortunate to have you to study under."
Publication date: 11/19/2018
Want more HVAC industry news and information? Join The NEWS on Facebook, Twitter, and LinkedIn today!